Showing posts with label Windows. Show all posts

Monday 16 June 2014

Some Tips to speed up your computer

You are familiar with some of the operations that can be used on computer system to speed up its processing.
 

speed up PC

Here we have list out some of the methods and their uses to speed up your computer and run faster.

Disk Cleanup

All the Windows systems come with the Disk Cleanup tool preinstalled. It can be accessed via the quick search option in Start menu.


disk cleanup

The Disk Cleanup tool will search your entire hard drive and tell you which files you can delete safely to free up some space on your hard drive. The more space you will free up, the more faster your computer will work.

It is recommended that you must perform Disk Cleanup every 15 days or so to keep your computer speed constant.

Disk Defragmenter

Over a period of time, sometimes data on your hard drive gets fragmented which makes your hard drive to do some extra work and slows down your computer. That is why it is important to run Disk Defragmenter tool that defragment data on your hard drive, making it run faster. It can be accessed by using Start menu.  


disk fragmenter

Microsoft recommended that whenever your hard drive fragmented more than 10% then it is a good idea to run Disk Defragmenter tool.

ReadyBoost


             autoplayreadyboost speed up system


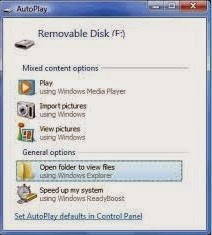
ReadyBoost is an option in windows operating system to use the memory of USB pen drive, SD card or other flash drives as a cache memory to boost the performance of your computer. Whenever for plug in any flash drive to your computer, the Autoplay option should show up on the screen in which there will be an option to Speed up my System using Windows ReadyBoost. Select the option and follow the instructions on the screen to enable ReadyBoost and if Autoplay not enable on you system then you can access ReadyBoost option by Right Click on the flash drive which is connected to your computer. Now your computer will use the memory from your external drive to boost the performance and speed of your computer.

MSCONFIG

        
                       msconfig

Whenever Windows start, there are number of applications that get loaded automatically into the memory occupying valuable system resources. So it is important to run MSCONFIG tool to check which applications starting automatically with Windows. It is advisable to disable all the applications that you don't really want to use, in order to free up some memory space on your computer. This improves your computer boot up speed and also the performance of your computer.

Disable Search Indexing

The latest versions of Windows use Search Indexing to index all your hard drive and help you in better and faster search. But Search Indexing effect on performance of you computer and can slow down your computer. If you want to disable Search Indexing then go to My Computer > Right Click on C: drive and select Properties and you can see under the General tab there is an option to disable Search Indexing.

properties

It is useful information for any computer user and you should implement all these tips so that your computer will never slows down. Keep visiting for more useful information.

Thursday 12 June 2014

How to Remove Shortcut virus from pen drive

pen drive shortcut virus

Probably everyone will have to suffer from the problem of Shortcut in USB pen drives or flash drives.

It can be very dangerous if you have any important data in the USB pen drive or flash drive. You have to format it for removing shortcut and all the data lost by this process.
But here is a solution for this problem. It is very easy and simple process to remove the shortcut virus.


pen drive shortcuts

It mainly causes due to some malware attack and it generates Autorun.inf file which converts all the files and folders into shortcut.

How to solve the problem ?


Apply following steps to solve the issue

*. Attach the USB pen drive or flash drive to the computer.


*. Press Win+R to open the Run command processor and type cmd to open Command Prompt.

*. Now type attrib -h -r -s /s /d f:\*.* and press Enter. Here f: is the drive on which the USB pen drive or flash drive is attached.

cmd commands

*. That's it now you can see all your files and folders as it is in the USB pen drive or flash drive.

Monday 9 June 2014

Hide Files and folders using CMD

Did you know you can hide your files and folders without any software in Windows ?
Yes, it is possible to hide files and folders by simple commands using command prompt.

Follow these simple steps to hide the folder and files:

*. Open Run command dialog box by pressing Win+R and type cmd to open command prompt window.

opening cmd using run command
  
*. Now type attrib +s +h D:/temp and press Enter. Here D: denotes the drive on which folder is located and temp is the folder that you want to hide.

command for hiding files

*. Now look into the drive for the folder your folder will be hidden.
*. To show the folder again type in command prompt attrib -s -h D:/temp. You can see that your folder is now visible.

hide and unhide files usind cmd 

This is a very easy windows trick you may use for your convenience.

How to create our own Run Commands in Windows

The Windows is a very popular and popular operating system and the Run command feature is a most powerful feature of Windows which enable you to open any document or application easily and quickly. So, rather clicking on several icons or using multiple commands, you can use Run commands to open any program or document instantly. For that you need to create Run commands for any software that you use frequently.

Create run commands

How to create Run commands ? 

Its very easy to create Run Commands. First of all open Run window by pressing window key along with R key i.e. Windows+R.

*. First step is to select the software for which you want to make custom Run command. For example, let us consider Mozilla Firefox. You may use any application or software other than which is already there in Run command.

*. In next step Right click on the desktop and make a new Shortcut.

*. As you select the Shortcut, it will open up a dialog box asking the path of the application or software for which you want to create
Run command.

*. Now you need to provide the path of the application's .exe file i.e. "firefox.exe". It can be found out in the C drive under Program files.

*. After that just provide a relative name for the Shortcut that means rename it with the name which will be used as your Run command.
For example, "ff" for firefox.

*. Now click on Finish button. Then the shortcut of respective application will be created on your desktop screen.

*. In the next step just cut and paste the created Shortcut into the root drive i.e. C:/Windows/. For this make sure you are the administrator of the computer.

*. Now, you are done with the process of creating the Run command and you can use "ff" as a Run command to open Mozilla Firefox application.

run your own command

Hopefully this simple but useful trick will help you.

Saturday 7 June 2014

How to Fix the Runtime Error r6034

Sometime when we install any new software in our PC and when we start our PC or reboot, it will show an error message titled Microsoft Visual C++ Runtime Library and the message Runtime Error r6034, and informed that an application failed to load C runtime library correctly. Now we will see what is this error and how to fix it.

What is Runtime Error r6034 ?

runtime error
  
It is a common type of computer error. The issues that can cause this error are appears on the screen with message box. It informs the user about the error and gives him the definition of what kind of error is this.

Several issues that can cause this error are:

*. Software issues
*. Conflict Application
*. Memory uses Faculty
*. Conflict between the terminate and stay resident programs

How to fix the Runtime Error r6034 ?

There are several very easy ways to fix this problem.

*. Run a full registry scan, Use third party softwares to do it and repair registry.
*. Disable all the startup applications.
*. Rename all the dynamic link library (DLL) files on your computer.
*. Re-install newly installed programs.
*. Start your system in safe mode.
*. Use a reputed antivirus program to remove any viruses or infected programs.
*. You may use Malwarebytes anti malware program to remove any malware.

In these ways you can fix the error. It is very important for any computer user to know these kind of errors so that we can able to fix them if they interrupt our work.

Friday 6 June 2014

Inside the Computer.......

Have you ever tried to open your PC and looked into it ?
If no then I will tell you what are the components on which a computer runs and how they looked inside a computer.

CPU/Processor

CPU the processor

I think everybody should know about the CPU of a computer, which we also called Central Processing Unit and also the Processor and the brain of the computer. But where it is located ? The answer of the question is that it is located inside the computer case on the motherboard of a computer. Whenever you press a key or start any application the instruction to act on it goes to the CPU.

CPU is a 2 inch ceramic square with a silicon chip located inside.
The CPU fits into the motherboard's CPU socket which is covered by heat sink from which the heat is absorbs from the CPU.

The speed of the processor is measured in MHz (Megahertz) or GHz(Gigahertz). The faster processor can execute more instructions faster. But processor is not the only medium to get speed on the computer. The speed depends on the number of components of the computer.

Motherboard
motherboard
It is the main circuit board of the computer. It is a thin plate that holds the CPU, external USB ports, memory, connectors, hard drive optical drive etc. The motherboard actually connects every parts of the computer either directly or indirectly.


Power Supply Unit


power supply unit

The power supply unit converts the power came from the main power supply unit of your home or office to the power needed by the computer. It then sends that power through the cables to the
motherboard and the various components of the computer.

Tip: If you are trying to open your computer case then be sure that you unplug the power supply to the computer. Before touching any object inside the computer touch the grounded metal objects to discharge any static buildup.

RAM

RAM

RAM which is also known as Random Access Memory is a memory which is volatile memory, means as soon as the power off the data in the RAM will lost. When performing any calculation or logical operations it stores the data temporarily to perform the operations on that data.

RAM measured in terms of MB (Megabytes) or GB (Gigabytes). If you have the more amount of RAM then you can use more applications simultaneously i.e. Multitasking capabilities increases of a computer.

Hard Drive 

hard disk drive

Hard drive is a place in a computer where you can store data. It is the place of your installed softwares and also where the documents were saved. It is a long term storage memory where data will be saved even after the power off. When you open any document or a software then computer copies small amount of data into the RAM to easily access the data.
Common hard drives are Hard disk, floppy disk, flash drives, disk drives.  

Sound and Network Card

The sound card is responsible for what you hear from the speakers or headphones. Motherboards have built in sound card but you can upgrade it to enhance the sound quality.

The network card allows you to communicate over a network and access the internet. Almost all the motherboard have the built in network card and also has a expansion slot to add another upgraded card.

This guide can be helpful for beginner computer users. Hopefully they understood the simple basic internal interface of a computer.

Wednesday 4 June 2014

Customizing folders with different colors

Nowadays customizing our computer is very easy with the help of different customizing softwares. We always want that our computer look well and organized in a clean customized manner so that we can easily access the documents or other files easily.

Similar way we will discuss about a software that can be used to change the color of folders in order to differentiate them and can be easily accessible to you. 


folders with colors

How to customize folders with different colors ?


colorizer process


*. The first step is to download and install the software FolderColorizer. Download it from here.

*. After installing software, right click on the folder that you want to customize. When you right click on folder you will see a option in the menu i.e. Colorize. Go to that option and you will see a sub menu. Now you can choose the color that you want to assign to that folder.

That's it, very easily you have changed the color of your folders. You can change the color of folders in any of your drives i.e. C, D, etc

Tuesday 3 June 2014

Lock your PC with USB

Do you know you can add an extra layer of security to your PC when you are not using your PC ?
If you don't know about this then this post should be helpful for you.

You can use your USB flash drive to lock your PC. We can use USB to unlock the PC as we use normal password to unlock our PC. You can access the PC till the USB is connected to the computer. It will be automatically locked when  USB drive is disconnected from computer.

USB lock your PC

To use this security you will need a security tool "Predator". You can download it from here Professional Edition [Link] and Free Edition [Link]

Process for using this tool:

*. After downloading Predator connect your USB
drive to the computer which you want to use as a key to your computer.

*. Then run the installer. A pop up asking you to create a new password will generated. Click on OK to continue.

create password popup

*. You will now proceed towards Predator Preference settings.

preference settings

*. Enter the desired password and select the USB drive letter on which USB is located and then click on Create Key it will be used by Predator to monitor.

*. When Predator is running it will show a icon in the taskbar.


taskbar predator icon

Now you are protected with USB. Whenever you want to lock your computer with USB just remove the USB flash drive and after some time the computer will be locked. If you want to unlock it then connect the USB to unlock it.

Monday 2 June 2014

How to Disable Dual Boot

Using two operating system on your PC ? Removed one OS but still that OS appears on Start up ? Want to Remove the Dual Boot option on Start up ?

We have the solution for this problem. If  you have running two OS Windows 7 & Windows XP and removed Windows XP but it still appears on start up. Then refer to the below guide to fix the problem.

See the below screenshot that appears when dual booting two or more operating systems. 

How to remove one of the OS and Dual Boot ?


Its very simple to remove any OS. You have to just format the drive on which your OS is installed. But at start up again the same screen will appear asking which operating system you have to start.

Here is the solution for this:

*. Go to the control Panel and then System and Security
*. Click on advanced system settings, see the below screenshot.

Control Panel system and security  
*. A new window will open now click on Settings under Startup
and Recovery 


*. Now select the operating system that you want to choose and uncheck the box below it. Refer to the screenshot below.
 

That's it.... you wont get a startup boot menu option and the default operating system loaded automatically.

Popular Posts