Saturday, 20 June 2015

How to accept all Friend Requests at once on Facebook

Facebook as everybody know the largest social networking website. Everyone likes to be on Facebook and chat with friends, share photos, make friends, share stories and lot more. Most people using Facebook like to make lot of friends and some people may got hundreds or thousands of requests everyday. So it is very difficult for them to confirm these requests easily and if you have a slower connection then it is going to be very much frustrating task. But here on TechAntic we are always want to make your life easy with simple tricks that works.

pending facebook friend requests

Is this trick work ?

It will be work for most of the people and I have tried it personally and you don't have to misunderstand this trick is hacking or something. It is simple programming code which simplify your task.

How to Confirm or Accept Friend Request at once ?

*. First of all you need to log in to Facebook. Go to https://www.facebook.com/reqs.php

*. You will find out all the pending requests on this page if you have lot of friend requests then you have to click on Show more. Click on this until all the friend requests are visible.

*. Now right click anywhere on the page and click on Inspect Element and then click on the Console tab and paste following code as it is

javascript:for( i = 1;i<document.getElementsByName("actions[accept]").length;i++){document.getElementsByName("actions[accept]")[i].click();}void(0);

confirm facebook friend requests using inspect element

Note: If you're using Inspect Element in Firefox for the first time then it may possible that Firefox won't allow you to do that. If it happens then type enter on the Console panel and you are now allowed to paste.

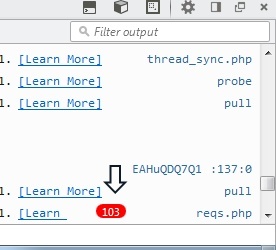
After all this process completed successfully you will see something like this as shown in the screenshot below. It means that your friend requests are started confirming automatically. Wait for sometime and all your pending requests will be accepted.

confirm accept friend request automatically

Hopefully this post helped you and you would enjoy using it. Keep in touch with us and don't forget to share the post.

Friday, 12 June 2015

how to enable Windows administrator account

Windows provide separate accounts for different users of the OS. There is one administrator user account who has all the privileges to access all the features of Windows but this default account provided during installation has limited access operations. Even though you have been using the account with administrative privileges, the tasks that have been performed may ask for a UAC confirmation. The elevated administrator account has been disabled in the windows 7,windows 8,windows 8.1 and windows vista.

Following are some simple methods to access administrator account of Windows:

*. If you are using Windows 7, 8 or 8.1 then you need to open command prompt (cmd) in administrator mode.

*. Then enter following commands on the command prompt
                                                 net user administrator /active:yes

After that,you would see a message that your command was successful. This will activate administrator account and you can access it after logging off the system.

administrator account activeted successfully

*. To disable the built in administrator account execute following commands on the command prompt
                                                   net user administrator /active:no

*. After this the administrator account will mo longer appear on the login screen.

This simple tutorial will definitely help you overcoming the problem of administrator privileges.

Friday, 5 June 2015

All about "Get Windows 10" app its problems and solutions

Everyone should aware of the Windows 10 upgrade which will be rolled out from 29 July 2015 throughout the world. It is a free upgrade for the users who own legal license to either Windows 7,8 or 8.1. Microsoft announced that all the upgrades to the present Windows users will be rolled out by a Get Windows 10 app which is similar to Windows upgrade assistant and you don't need to download is manually instead it will be automatically downloaded with the Windows updates.

get Windows 10 app reserve upgrade

How to install and use Windows 10 app?

*. As far as getting the Get Windows 10 app (GWA) you need to update your Windows with the optional update KB3035583.

get windows 10 app icon

*. With this update the app is automatically downloaded on your computer. This puts a small Windows logo near your system tray on task bar. You can click on that icon to check your system's compatibility for Windows 10 and after the launch of Windows 10 you can upgrade your Windows with Windows 10. You will need a good internet connectivity because it will approximately 3GB.

*. After this you will see a small Windows icon on your task bar near system tray. This can be used to start the app and you can check your system's compatibility with the app and also use it for later Windows upgrade when it will launch officially.

*. You can also reserve your Windows 10 upgrade for getting the notification when it is launched.

Problems and solutions for installing the Get Windows 10 app

*. If you don't see the icon of the app you need to check whether the update KB3035583 is downloaded and installed on your computer.

*. Check this from Windows update history. If you don't see the update you need to check for updates for the update to download and install.

*. Another way to check this update is from Command Prompt (cmd). Open cmd and type

                                        dism /online /get-packages | findstr 3035583

You will see output like this:

                         Package Identity : 
                        Package_for_KB3035583~31bf3856ad364e35~amd64~~6.3.1.29

If you still not getting the App icon on the taskbar then follow the following steps

*. Open Notepad and copy and paste the following script

REG QUERY "HKLM\SOFTWARE\Microsoft\Windows NT\CurrentVersion\AppCompatFlags\UpgradeExperienceIndicators" /v UpgEx | findstr UpgEx
if "%errorlevel%" == "0" GOTO RunGWX
reg add "HKLM\SOFTWARE\Microsoft\Windows NT\CurrentVersion\AppCompatFlags\Appraiser" /v UtcOnetimeSend /t REG_DWORD /d 1 /f
schtasks /run /TN "\Microsoft\Windows\Application Experience\Microsoft Compatibility Appraiser"
:CompatCheckRunning
schtasks /query /TN "\Microsoft\Windows\Application Experience\Microsoft Compatibility Appraiser"
schtasks /query /TN "\Microsoft\Windows\Application Experience\Microsoft Compatibility Appraiser" | findstr Ready
if NOT "%errorlevel%" == "0" ping localhost >nul &goto :CompatCheckRunning
:RunGWX
schtasks /run /TN "\Microsoft\Windows\Setup\gwx\refreshgwxconfig" 


*. Save this script as ReserveWin10.cmd in any directory like C drive.

*. Run the saved file as administrator and wait for the operation to complete. It may take 10 to 15 minutes to complete so be patient.

I hope you enjoyed this article and also hopeful that you will sort out the issues with windows 10 app. If you have any queries you can comment it below.

Friday, 13 February 2015

How to use WhatsApp on your browser

WhatsApp the worlds most popular messaging app is now available to you straight from your pc browser. Yes it's true you can now use your favowrite messaging platform on the web using your browser. This is an official WhatsApp's service for its users. The service is only available for Chrome browser and WhatsApp promises to deliver it on other browsers soon.

All the Android, Windows phone, Nokia and Blackberry users can get the benefit of this service. iOS devices are not yet supported due to Apple's platform limitations. To enjoy this service you need to have latest version of WhatsApp running on your phone and a Google Chrome browser on your pc.

How to use WhatsApp web on your browser

So let's begin and see how you can use WhatsApp on your web browser.

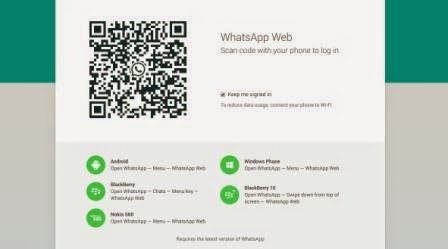
*. Open your Chrome browser and head over to the following url https://web.whatsapp.com and you will see something like in the screenshot below.

use whatsapp on your browser


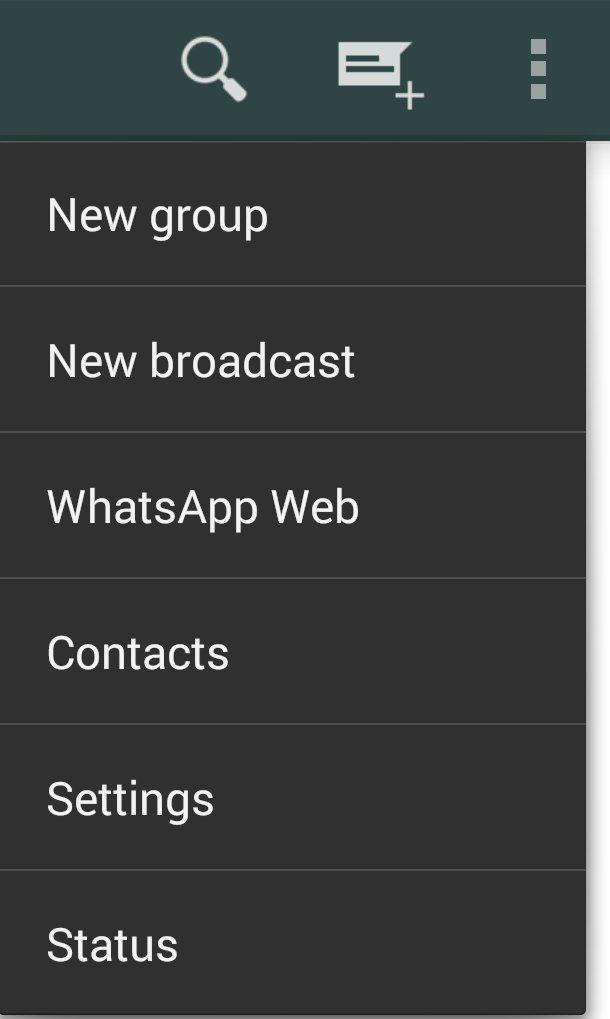
*. You can see a QR code on your browser. You don't need a QR reader you just need a phone on which you installed WhatsApp. So open your WhatsApp on your phone and tap on more options (which you can get from the three dots from the top right corner) and choose WhatsApp web.

whatsapp web option


*. A QR reader will open on your phone. Now point your phone towards the QR code on your computer and it will automatically logged in after reading the QR code.

*. Once your phone and computer are connected you are able to manage your logged in computers f1rom your phone via the Options  on the web menu of WhatsApp. From here you can log out from all computers or you can use the options menu in WhatsApp on the web to log out from the PC you're currently using.

*. WhatsApp will by default keep you logged in, but having logged out you'll need to go through the QR code process again the next time you want to log into WhatsApp on that machine.

Easier isn't it...! Enjoy WhatsApp on the web on your computer and start conversation in a new way from your browser.

Saturday, 31 January 2015

Hike launched free voice calling service before WhatsApp

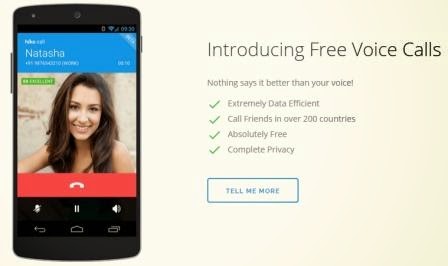
Indian messaging app hike launched free voice calling service before WhatsApp over 200 countries. WhatsApp's free voice calling rumored were flooded on the internet in last few days but the official launch of such a service is not announced yet. Hike done it before WhatsApp with the VoIP (Voice over internet protocol) system which enables you to call anyone of your friends who installed Hike on their phone for free with little data charges.

free voice calling from hike

Friday, 30 January 2015

Unlist your name from Truecaller

Do you use Android? Today most of the people prefer Android smartphones. As it is a widely used technology in the world today and the cheaper cost of phones make it very popular among youth. Today we will discuss how you can remove your name from Truecaller's database.

remove or unlist your name from truecaller

Truecaller is very well known application in the smartphone world. It makes you easier recognizing the unknown caller and his/her name appears on the screen whenever you search for an unknown number. But sometimes you don't want to reveal your identity to the public and you don't want to make your identity available to all the Truecaller users, so what you should do? Don't worry now a solution is available for removing your personal details i.e. your name and picture which is available to all the Truecaller users can be easily removed.

How to Unlist your name from Truecaller database

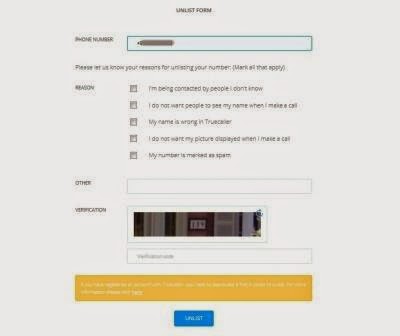
To unlist or remove your name and picture from the Truecaller database you just need to go to the following link http://www.truecaller.com/unlist and you will see an Unlist from.

unlist your name from truecaller database

*. In the form Enter your mobile number with country code.
*. Tick on the reason for which you wish to remove your identity from Truecaller.
*. Finally enter the security code and click on Unlist and then OK when prompted for confirmation.

That's it.........now your mobile number and photo never revealed while anyone searching your number on Truecaller.

Monday, 26 January 2015

How to access blocked sites using Hola

If you are living in a country where some sites are blocked by the server or your office or school colleges have a restricted access to the Internet then this trick may help you in many ways. Most of the colleges and school applied some security firewalls that doesn't allow you to access certain sites. There are lots of options available to access blocked sites such as using proxy sites, VPN servers etc. But local administrator can also block these services also so it is very important for you to know about different tricks to bypass the restrictions. So we are here to help you.

Today we will see another excellent service Hola which can be used to access sites that are blocked by a local administrator. If you want to check the previous post check it here How to access blocked sites using Cocoon.

access blocked sites using Hola

What is Hola?

To access blocked sites here is an excellent service named Hola which provides wide variety of services on different platforms. It is free to use VPN service. You can use Hola on your computer as well as on your mobile phones. Hola is a browser extension for Mozilla Firefox, Google Chrome and Internet Explorer. It is also available as an application software for Windows and Mac. Also Android and iOS devices can use Hola to access blocked sites in any public or private network.

How to access blocked sites?

Using Hola to access sites is very simple check out their official website http://hola.org

*. Download Hola as a browser add-on on any browser.

hola extension for firefox

*. After successful installation you will see an icon on top right corner.

browse and access blocked sites from us server


*. Open any blocked site. If you unable to open that site then click on Hola's icon and select the country like US and in a few seconds you may able to access blocked site easily. See the example screenshot below for netflix.com

netflix before and after unblock

After unblocking site you will see any country's flag like US from where you are accessing that site and you won't be trapped by anyone. Stay and surf anonymously anywhere.

Friday, 23 January 2015

How to backup and restore WhatsApp conversations

WhatsApp becomes an important aspect of today's life. Backup and recover of WhatsApp data is also very important. You are always on the go chat with friends and share images, videos and much more with ease. Sometimes you need to delete some of the messages or to clear some memory you just completely wipe out your WhatsApp data. But if you come to know that there are some important messages that you need now then what will you do? Don't worry, this problem can be solved by using some simple backup and restore process.

Sometimes if you reinstall WhatsApp on a newly purchased phone then you may able to recover your messages by using this simple and effective tutorial.

How to backup and restore or recover deleted WhatsApp messages?

There are lots of WhatsApp users who reinstall WhatsApp on different phones multiple times so that it becomes and important job for them to take a backup of it. Let's see how it works.

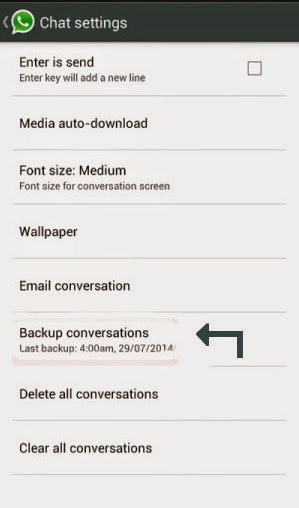
*. First of all take backup of all your messages by going into Chat settings and tapping on Backup conversations as shown in the screenshot below.

backup whatsapp conversations

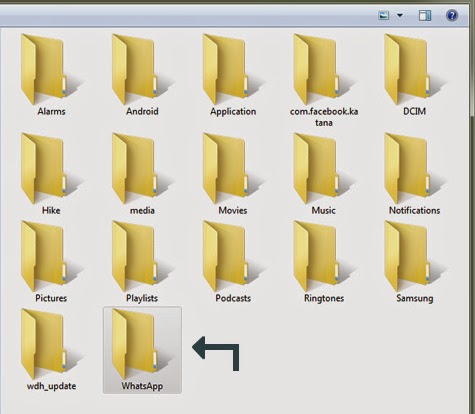
*. Next step is to copying WhatsApp folder from your older phone to your computer. To do this just connect your phone to your computer or laptop and copy the folder named as WhatsApp.

whatsapp backup folder location

 *. Now install WhatsApp into any other phone where you would like to use it or you can reinstall it on the same phone if you would like to recover deleted messages. Note that if you are installing it on the new phone you need to copy the WhatsApp folder to that phones memory either internal or external i.e. micro SD cards etc.

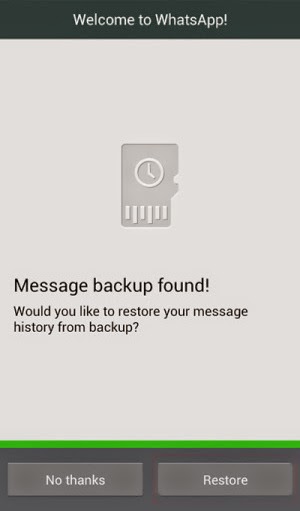
*. During installation WhatsApp will automatically detect your backup and prompt for recover them. You just need to tap on Restore to restore deleted WhatsApp messages or on another device you need those messages.

backup and restore deleted whatsapp messages

 That's it....! How easy is to recover deleted messages, audio files and videos or restore and backup WhatsApp conversation. Enjoy using WhatsApp.

Thursday, 15 January 2015

Top 5 best antivirus software Review 2015

There are lots of software manufacturers are in the business of Antivirus and Internet security tools. All of them claim that their product is best among all the competitors in the market. How well they perform in a real world? Which is the best? Who provides best Internet security? There are lot more questions arises before choosing an Antivirus solution. Here we will look among some best security suites too minimize the confusion.

best antivirus software and internet security

1. Bitdefender Total Security 2015


bitdefender 2015 best antivirus software

One of my favorites Antivirus and Internet security software Bitdefender Total Security 2015 is a total package. It has some premium features includes file encryption, device antitheft and secure online storage.

*. Bitdefender Total Security 2015 engages security with a single click.
*. Bitdefender’s OneClick Autopilot automatically makes the best security decisions for you.

*. Bitdefender Total Security 2015 automatically detects when you Work, Play or Watch movies, and prevents other apps from slowing you down.

*. OneClick Optimizer speeds up your system and frees up disk space.

*. Bitdefender Wallet simplifies purchases by securely autofilling your credit card details.

*. A two-way firewall, parental controls and cloud antispam are another few features.
In my words it is one of the best security provider and you should try for it.

2. Norton Internet Security 2015


Symantec's Norton one of the best antivirus software

The user interface is much easier to use and navigate than the previous versions of Norton. This year Norton done a good job and you can get one for you if you are fan of Norton products.


*. In real-time antivirus tests Norton scoring near the top and blocked nearly all known viruses.

*. Norton uses less memory, it uses less than 1% CPU and only about 7MB of memory and during full system scan CPU usage at about 55%-90% and 50MB of RAM which is average usage.

*. There are five basic sections for each function of the software. Each is clearly labelled with big icons.

*. Overall, it's a clean, modern and easy to use simple interface. 

3. Kaspersky Internet Security 2015


kaspersky internet security

In the recent years Kaspersky has grown to become a global leader in PC security. It has very good virus and malware protection.

*. Kaspersky is extremely good at identifying, blocking, and removing virus and other threats. Kaspersky's heuristic protection and false positive detection also nearly perfect which detect previously unknown viruses.

*. It has very good overall malware protection


*. Kaspersky uses 130MB of RAM while in idle state and goes to 550MB when full system scan which we think is too much compared to others.

4. Vipre Internet Security 2015

vipre antivirus

With several added security features and the same antivirus protection of VIPRE Antivirus, VIPRE Internet Security earns our "Editors' Choice Award" again this year, even though the software isn't perfect.

*. The antivirus engine has excellent real-time protection and is effective at removing viruses. Its malicious website filter prevents you from accidentally visiting a known harmful website.


*. Firewall protection is great and it scores 10 out of 10 in our tests.

*. There are some extra features for added security like its Facebook scanner and its history cleaner.

*. User interface is not that much good enough it has to be improved.

*. Even though the user interface isn't that much better it does it's job better than any of the other Internet Security software. And if ever get infected, ThreatTrack Security (VIPRE's makers) will help you remove it for free.


5. AVG Internet Security 2015

avg internet security 2015

AVG is all known to us for their free Antivirus solution. But basic Antivirus doesn't ensures fully protected PC. For 2015 AVG has significantly improved their Internet Security suite this year with an improved firewall, and better overall protection.

*. The user interface is much more modern and easy to use.


*. Malware detection is very good with AVG which was an issue before this.

*. AVG is not bad in real time protection also and it performed well in this category.

*. It consumes low memory space.

*. It is one of the better all around Internet Security suites.

This is our review among the top Antivirus and Internet security products hopefully you enjoyed it.

Monday, 12 January 2015

How to access blocked sites using Cocoon

Are you frustrated the way online colleges and schools blocking websites? Did you just hate Cyberoam blocking sites in colleges. Don't worry now we have a solution for you. These days crazy Internet surfers like us are always want to access torrents, facebook, twitter and other social services in offices, schools and colleges also but the firewalls of these institutions are also becomes very stronger and cannot be bypassed easily but thanks to Cocoon these restrictions can also be overcome easily.

cocoon online internet privacy

What is Cocoon?


Cocoon is basically a browser add-on which is used to bypass internet restrictions. According to the cocoon developers,
"Cocoon is an all-in-one plugin that makes everything you do online secure, virus-free and private. Without Cocoon websites and hackers have access to your computer to leave cookies or infect it with viruses and malware. You even get protection on open Wi-Fi access points."


There are number of advertisers who track your every move, hackers in a hurry to steal your passwords and viruses needs a chance to attack your computer. To avoid all this you want something that hide you from the threatening things of the Internet world and here comes the Cocoon.

Cocoon is available for Firefox, Google Chrome and Internet Explorer that helps you browse the Web securely in an anonymous environment. Cocoon is available for free download and also available in paid version that is also known as Cocoon+.

How Cocoon works?


Cocoon uses a proxy service, so that all of your browsing is done through Cocoon's servers. All the web sites that you browse see their IP address or ISP instead of tracking you.
Cocoon scan files before you download ensuring that your computer won't be attacked by any malware.

How to use Cocoon?


Using Cocoon is very easy and don't need any specific knowledge. To use Cocoon following steps will help you.


*. First of all signup for a cocoon free account from https://getcocoon.com/signup_free and then download Cocoon add-on from the official website https://getcocoon.com/support/download

cocoon add on for firefox

Note: If download not works then you can download from following link directly https://getcocoon.com/downloads/vwc_cocoon.xpi?303486

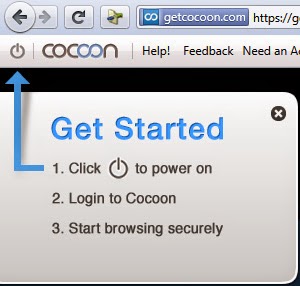
*. After install you need to restart your browser and you will see a Cocoon toolbar. Just press the power button and you will see a Email address and Password fields.


start browsing with cocoon

*. Now enter your email address and password that you used while sign up process and click on Go.

cocoon toolbar attempt to login

*. Now Cocoon will start attempt to login from different proxies and in a few seconds you will be connected to the Cocoon's private world.

*. Now open any website that is previously blocked and enjoy browsing anonymously.

That's it, browse the web, bypass firewalls and Cyberoam restrictions with ease.

Thursday, 8 January 2015

How to remove write protection from USB flash drives

Security from viruses is among the greatest priorities for any Windows user. USB flash drives such as pendrives are most likely to catch viruses from any devices and may harm your files. There are some recovery techniques available after corruption of data due to virus or say malware attack but still you notice that every now and then pendrives catch viruses.

usb flash drives write protected gdrive

For the security purpose many people use write protection on their USB flash drives, pendrives so that it may not affect by the malware attack. But if you want to remove write protection on the pendrive or any other external USB flash drive for copying any important file you can do this using this simple registry tweaking trick.

How to remove write protection from USB flash drives

Method 1: Using Registry 

Follow the steps and you can write data to your pen drive.

*. Open notepad or any text editor and copy & paste the following:

[HKEY_LOCAL_MACHINESYSTEMCurrentControlSetControlStorageDevicePolicies] “WriteProtect”=dword:00000000

*. Now save the file with .reg extension.

registry file

*. Now double click on the file you have saved and in the pop up window choose Yes and you will see the message as in the screenshot below. That's it just press OK and you're done, now you can write any type of data on the pen drive.

registry key applied successfully

To Turn ON the write protection you may follow the same procedure as above but paste the following code instead of above

[HKEY_LOCAL_MACHINESYSTEMCurrentControlSetControlStorageDevicePolicies] “WriteProtect”=dword:00000001

Method 2: Using Diskpart

*. Open command prompt as an administrator and type diskpart.

*. Then type list disk and press enter to see the list of drives.

*. Select the USB drive by typing  select disk 1 (if disk 1 is your USB drive otherwise choose the number which assigned to your  USB drive)

*. At last type attributes disk clear readonly and press enter. Finally type exit  to quit diskpart and you're done with the process.

cmd diskpart commands to remove read only

That's it you have no write protection on the usb drive now. Enjoy the trick and keep your system safe from viruses.

Tuesday, 6 January 2015

How to download say thanks Facebook videos

We are back with another awesome trick. Did you know about Facebook's new photo messages which you can create for your friends on fb? Many of you are very well known about this video messages provided by facebook for it's users.

What is Say Thanks video?


Say thanks is created by Facebook to provide it's users video greeting cards. By using the say thanks feature of facebook users can create thanks video for their friends on facebook. It's a customizable video greeting in which you may add some another photos from your computer and make a video of it or can use previously shared photos with friends and create a great video to say thanks to your friends for being with you for a long time. You can create say thanks video from the link https://www.facebook.com/thanks

How to download say thanks facebook videos?

Most of the users already created say thanks video using facebook's say thanks feature. But they are not able to download it only they can view it online. Some of my friends also asked me about how they can download the video. But don't worry friends now you can able to download the video and also other videos which are not downloadable on the internet or on the Facebook. To download the video here is a complete solution, follow it and enjoy the download of facebook's thank you cards.

*. First of all download the firefox extension Video DownloadHelper from here.

video download helper firefox icon

*. Now login to facebook and play the video which you want to download.

*. When the video starts playing you will see the moving icon on top right side on your firefox. Now click on the small dropdown icon and then click on download. You can also convert the video format by clicking on Download and convert.


say thanks facebook videos download


*. That's it your video will now starts downloading.

Hopefully you like this post. Keep visiting for some more tricks for you.

Saturday, 3 January 2015

Android data recovery with Coolmuster Lab.Fone

By the increment of the Android devices it is very common nowadays that you take pictures, videos from your phone and also all the contacts and important messages are there in your Android phone and if you deleted any important contact or a message accidently then it is very difficult for you to deal with the situation but here we are discussing one of the hard drive data recovery services. Actually it is an application for Android data recovery. It can be used to recover deleted images, videos, contacts, messages etc.


coolmuster lab fab data recovery for android

According to the developers of Coolmuster Lab Fone
"Lab.Fone for Android is engaged in recovering Android data lost due to deleting, restoring factory settings, flashing ROM, rooting, water damaged, screen broken and more scenarios. You need only 3 simple mouse clicks to accomplish the whole data recovery process for your Android phone or Android tablet."

How to recover deleted contacts from Android phone

Firstly download and install Coolmuster Lab.Fone software for Android from here.

*. Now connect your android phone with USB cable to the computer.

*. Enable USB debugging in your phone. To do this go to settings>>Developer option>> USB Debugging.

*. After that click on Allow on your phone to allow the program super user authorization.

*. Now run the software and it will automatically detect your device and SD card and scan them deeply.


coolmuster lab fone data recovery device connect

*. After completion of scanning it will show all the files in different categories like Messages, Contacts, images etc.

Note: To recover contacts and messages you have to root your android phone.


*. Now you can preview your contacts and click on Restore and select an output location and it will start data recovery. After few seconds check the output folder and your recovered contact will list in there.

Same method you can use to recover other types of files like audio, video, images etc. So if you lost your important data then don't worry and use Coolmuster Lab.Fone for data recovery of your Android phone.

Popular Posts