You may not thought about this before reading this
post. If its right then this will surely help you to know about yet another
trick for your Windows.
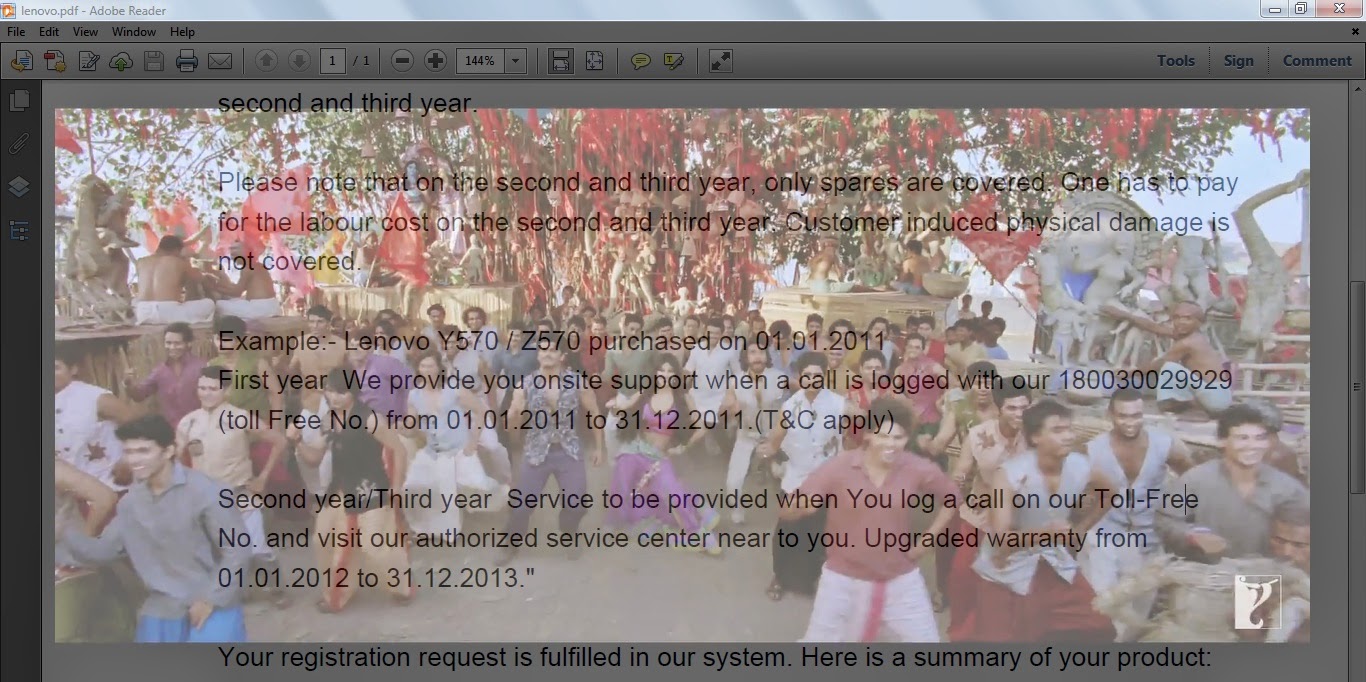
Making Windows transparent simply means you can
see through your active Window. Suppose you are working on MS Word then you may
also see your Desktop without closing it. It may help you whenever you want to
work on different Windows at a time. Just Imagine you are very excited to watch
a new movie from your computer and you have an important project which you have
to complete at the same time, then this post for you to solve the
issue.
How to make Transparent Windows ?
You need a small tool named
PeekThrough to do this. Follow the steps given below
to make it easy for you to make your Windows transparent.
*. First of all download PeekThrough
from here.
*. Click on the file install.exe and install it on your
system.
*. After installation you will see an icon in your system tray
as seen in the image below.
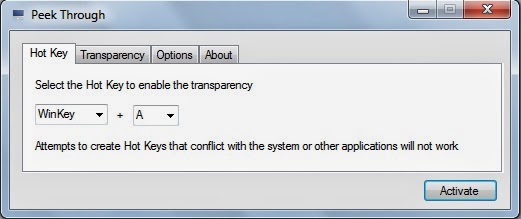
*. Now you just need to click on that icon and then click on
Activate to activate PeekThrough, after which you may
able to make your Windows Transparent with the shortcut Win +
A. You can also change the shortcut key.
*. To set transparency level just click on the
Transparency tab.
*. You have options under Option tab for start PeekThrough on
startup and also you can check an option Allow
click through of transparent window if
you want to click on other Windows other than your working Window after making
it transparent.
*. Now whenever you need to make any of the Windows transparent just
press Win + A and the same key can be used to make
Windows normal.
It’s easy… simple tricks can make your life easy. Keep following for further more
tricks.
Many of the times if you want to add images as a
background in windows explorer then you do this with the help of the small tool
named Windows 7 background changer. You can
change the background as you want with different images.
How to change folder background
Following simple steps will help you in changing
the background.
*. Download Windows 7 background changer from here.
*. For changing the background run the file
W7FBC.exe
*. Now click on Browse to select the
folder for which you want to change the background.
*. After selecting folder you need to add image for that just
click on Change Background Image and select the
image.
*. You can also change the text color of the folder name from
Text Color.
For removing the background follow the same procedure, just
select the folder location and click on the Remove Background
Image.
That’s it, it’s very easy isn’t it! Just
change background of folders and enjoy with the posts.
You may have different drives on your computer.
But do you know you can access any folders as a drive ? Yes it is possible. You
can create virtual drives and able to access them from My Computer without any
partition process.
How to access folder as a drive
For creating your own drives of folders. You need to follow some
simple steps as follows
*. Open Command Prompt from start menu or directly by pressing
Win+R and typing cmd.
*. Type subst F: D:\Files\folder and
hit Enter.
*. You can replace F: with your desired
drive letter.
*. You can replace D:\Files\folder
with the path of the folder for which you want to create drive.
Now you can see on My Computer that another drive with drive
letter H: is created. But it is temporary because when you restart your system
then this drive will be disappeared.
If you want to create a permanent drive without partition for
particular folder then you can do this by following process.
*. Open Notepad and type the code
@echo off
subst F:
D:\Files\folder
exit
*. Save this file with .bat extension and paste it to the
Startup folder of your system which is located at
C:\ProgramData\Microsoft\Windows\Start
Menu\Programs\Startup.
It is actually hidden by default you may change your system
settings to Show the hidden files and folders from folder and
search option in the view tab.
Now, just Restart your computer and you
are done. Enjoy with this tutorial.
Have you ever needs to Shut Down your computer automatically after some specified time. Are you slept by keeping your computer ON and forgot to Shut it down. Then this post will certainly help you. You can now sleep or go to another place without worrying about your PC and it will shut down automatically after some specified time.
How to shut down Windows 7,8 or 8.1
In the case of Windows operating system there is no predefined key to Shut Down your computer after specified amount of time. For this this simple tutorial will certainly help you. Follow the steps given below....
*. Firstly Right click on Desktop go to New and select Shortcut.
*. In the text box saying Type the location of the item type shutdown.exe -s -t 1800 and click Next.(Here 1800 denotes the time in seconds after which your system will be Shut Down)
*. Now in the Next field type the name of the Shortcut and you are done.
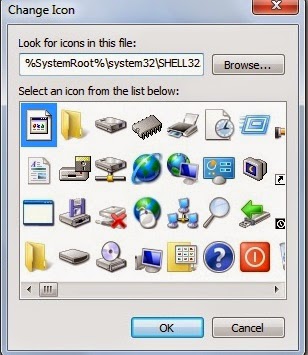
*. You can also change the icon of the Shortcut. For this go to properties of the Shortcut and click on Change Icon and select the icon that you want to set.
 *. Double click on the created icon to start the process of Shut Down. It will be shut down after the time that you set.
It is also possible to restart your system follow the same procedure and change the value to shutdown.exe -r -t 00
Same procedure can be applied to Hibernate or Sleep. For that the value is rundll32.exe powrprof.dll,SetSuspendState 0,1,0
To Lock your system the value is rundll32.exe user32.dll,LockWorkStation
Isn't it very simple.....That's it enjoy this tutorial and share with friends.
Did you ever need to copy text from any type of images? If you didn't able to do that then this post should be helpful for you. Yo will able to copy text from images without any need to download third party software.
There are certain tools available on the Internet that you can use but these tools are not that much accurate for copying text from images. So this guide will help you.
How to copy text from images
You know about a built in Windows softwares which comes under the Microsoft Office software tools i.e Microsoft Office OneNote. Actually it is a new software from Windows and it is pre-installed in Windows Vista or Windows 7, 8.
*. Open Microsoft Office OneNote from Start menu.
*. Copy the image from which you want to copy text and paste it into Microsoft Office OneNote.
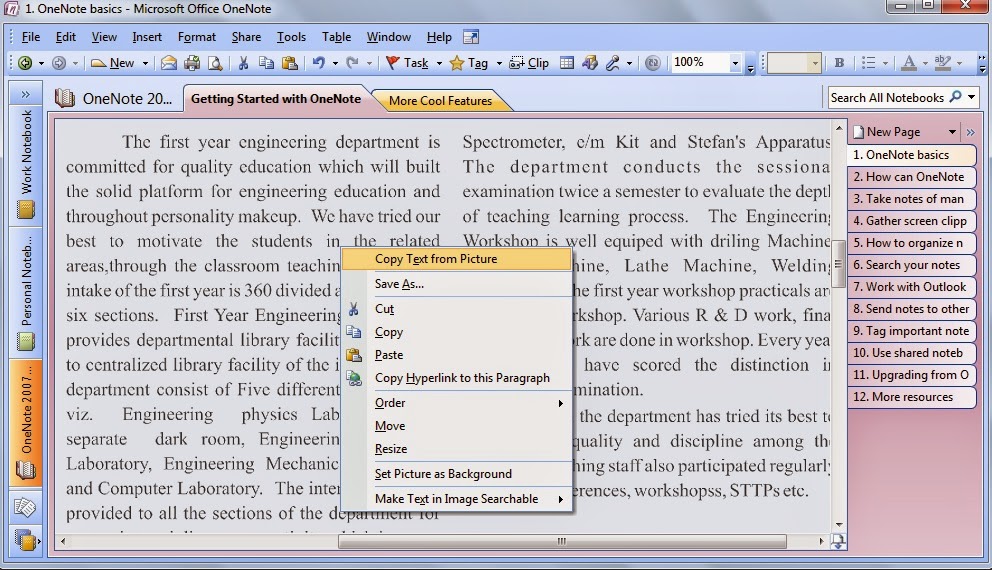
*. Now, Right click on the image and select Copy Text from Picture.
 *. Finally paste the copied text into any text editor like Notepad.
You done it! Isn't it very easy. You can also search text from images when you copy the image into OneNote.
You will able to know from this post about how you can increase your RAM in Windows 7. Basically we need RAM to improve performance of our computer and we can do any work on our computer efficiently. Gaming or running any heavy graphic application consume more amount of RAM, so we will learn to increase it.
Following steps will improve your PC's performance
*. Right click on Computer or My Computer and select properties.
*. Now click on Advanced system settings and in the Advanced tab click on Settings.
*. Now go to Advanced tab and click on Change.
 *. Uncheck the option Automatically manage paging file size for all drives.
*. Then select the drive (Recommended C: drive or any System managed drive).
*. Now select Custom size and enter the Initial size in MB like Recommended size. For ex. 4479 MB.
*. Enter Maximum size in MB like Recommended size. For ex. 4479 MB.
That's it click on OK and restart your system you can feel the improvement in your system.
Windows users should be aware of the Print Screen option available in Windows which allows users to capture their working screen. But whenever you want to see the captured image you have to paste it into any type of image editor such as MS Paint and then you can save it.
But you can save it directly into your desired directory. Don't know how? You will able to know it from following post.
How to save screenshot automatically
For this you need a small tool named as Screen Sniper. It is very small application and will not consume more memory of your system.
Follow following steps to get your screenshot image in your desired folder.
*. Firstly download Screen Sniper from here.
*. After installation you will see Screen Sniper icon in your tray.
*. You can right click on it and click on Show Screen Sniper, for selecting the directory in which you want to save your screenshot and also the hotkey (default is PrtScr & you can customize it). Also you can change the format of image you want to save.
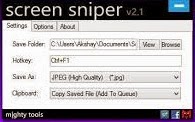 *. Now you are ready to take a screenshot. As you do previously just press the PrtScn button on you keyboard and within a second your screenshot image will be saved into the folder you selected.
Just enjoy with this small and useful post. Stay connected with TechAntic for more tips.
Recently most of the Windows 8 and Windows 8.1 PC were suffered from a problem of limited or no connectivity message shows up that is very annoying for any user.
This post will guide you to resolve limited or no connectivity message in Windows 8 Computers.
You may apply this guide if you have this problem with Wi-Fi connection, if you are connected to internet through LAN and we will happy to know about how you resolve your problem by using this guide.
One of the following methods will solve your problem.
*. Press Windows Key+ x+a to open command prompt directly or do this manually, but remember that you should open command prompt as administrator.
*. Type following command in the command prompt window
netsh int ip reset C:\resetlog.exe
*. Restart you computer to and if everything works well your problem will be solve.
If above process doesn't work then follow another method as given below.
- Change Wi-Fi Power Management setting
*. Press Windows Key+W and type “Network and sharing center” in the search box.
*. Click on “Network and Sharing Center”
*. Double-click on your Wi-Fi or LAN connection name and select properties.
*. Now, in the Properties window, click on “Configure”.
*. In the next window, click on Power Management Tab.
*. Now, uncheck “Allow the computer to turn off this device to save power” box (if it is checked).
 *. Click on OK and Login or Reboot your system to save the changes.
This is the most common method you may use to fix limited connectivity problem. Just disconnect your LAN network cable from your PC and modem. On Wi-Fi this will not work.
If all the above methods doesn't work then the below method will solve your problem. Mostly this will solve the issue.
*. Open command prompt in administrator mode.
*. Type all the three command given below one after another
netsh int tcp set heuristics disabled
netsh int tcp set heuristics disabled
netsh int tcp set global rss=enabled
 *. Now Restart your computer to complete the process.
That's it ! Your problem of limited or no connectivity in Windows 8 and Windows 8.1 will be resolved. Keep following our posts to get updated with tips and tricks.
Sometimes you have to delete some files permanently from your computer. You may delete files from your computer and also from Recycle Bin but they can be recoverable by using some recovering softwares. But if you want to permanently delete files and folders in a way that they will unrecoverable with any of the recovery software, so you can do this by using a software tool named Eraser.
Eraser is a third-party tool and it is a free and open source windows security tool which allows you to permanently delete files and folders from Windows PC.
It completely removes all the sensitive data present on your computer’s hard drive.
Features of Eraser
*. It works with all the drives on your Windows systems.
*. It erases files, folders and their previously deleted counterparts.
*. It works with an extremely customizable Scheduler.
How to Use Eraser
*. Download and Install Eraser from here.
*. Now, whenever you have to delete a file or folder, right-click on the file or folder and instead of clicking on Delete, click on Erase > Erase and the file or folder will be deleted permanently.
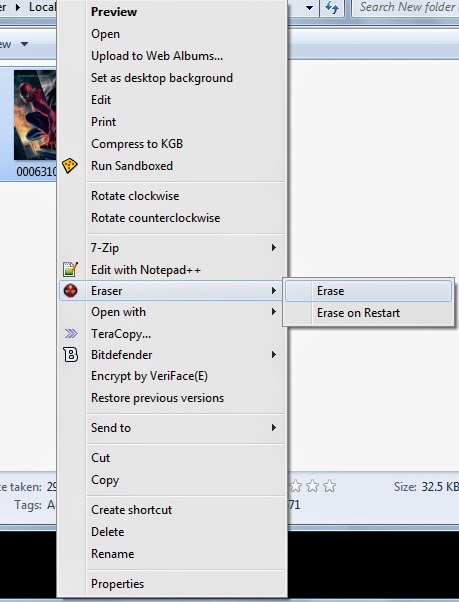 *. Another option is Erase on Restart, selecting this will delete your file when you restart your system. It can be useful if you delete any file accidently then it can be recover before you restart your system.
Here is another trick for you to convert any video to mp3 file format using VLC media player. You don't need any kind of third party software for this you can do it with your VLC media player.
VLC is comes with built in video to mp3 conversion feature. You can also convert video files into other video and audio formats.
How to convert Video to mp3 using VLC
You can convert video to mp3 using following steps:
*. Open VLC media player and click on Media from the menu and select Open Multiple files option.
*. Now click on Add to add a video file.
*. Here you have to add a video file which you want to convert to mp3 format.
*. Now click on a small arrow beside Play and select convert from the drop down list.
*. After that you have to select the conversion format, in this case mp3 and the destination where you want to save your converted mp3 file.
*. Now your conversion process will start in will and you can see the converted mp3 file on the location that you selected earlier.
That's it, you have converted video file to mp3 file format. Enjoy with the tricks and keep visiting for further more updates.
Not Genuine Error is very common among most of the Windows users if they are not using a genuine version of Windows 7 or other version.
Windows will show a message like "This copy of Windows is not genuine" at the bottom of desktop in every few minutes. This is due to the Windows genuine checker that checks whether the installed version of Windows is genuine or not.
How to make Windows 7 Genuine
Follow these following simple steps to fix this error of not genuine Windows.
Following two methods will solve your problem.
*. Open command prompt as an Administrator.
*. Now type slmgr -rearm and press Enter and wait for execution.
*. A dialogue box will appear asking you to restart your system. Click OK to restart your system.
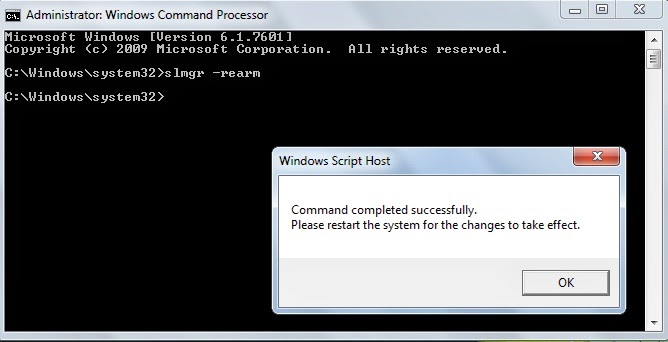
*. Now when you restart your system you will not get an error of not genuine Windows.
*. Download Remove WAT Tool from here in Zip file format and Extract it.
*. After extracting it, Right click on “RemoveWAT.exe” and select run as Administrator.
*. Now click on Remove WAT and then click on OK to confirm.
*. Restart your Windows 7 PC and that's it! You fixed the error of not genuine Windows.
Use any of these methods to solve your problem and enjoy using Windows without an error.
Most of the time you need to cut mp3 songs in smaller parts for that you can download any third party softwares but these softwares are costly and more softwares can slow down your computer. Everybody uses VLC media player as it is the best media player on Windows. We will use the power of VLC to cut mp3 files without any third party software.
How to cut mp3 Songs using VLC
*. First of all if you don't have VLC media player you can download it from here.
*. Now click on Media from menu and open the mp3 song you wish to cut.
*. Once you have selected song, click on View from the menu and select Advanced Controls.
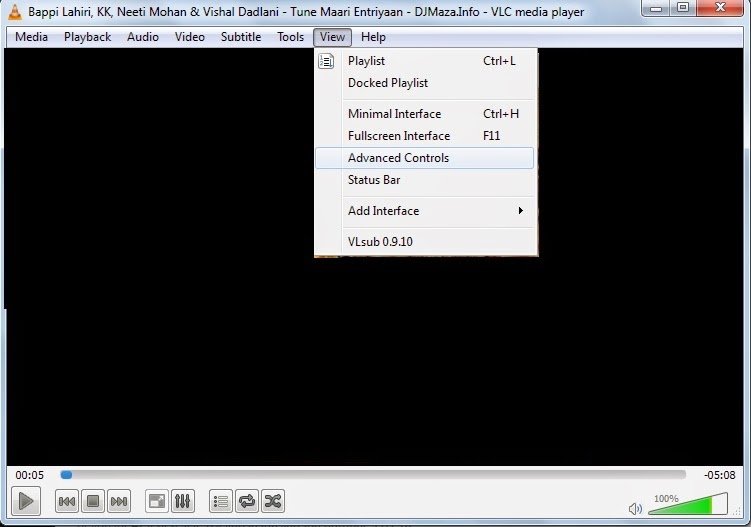 *. After selecting Advanced Controls you will see a red icon on bottom of the VLC player.
*. Now select the beginning point by dragging the slider and click on red button to begin recording and the song will be recorded. Now to stop recording you have to click on the same red button.
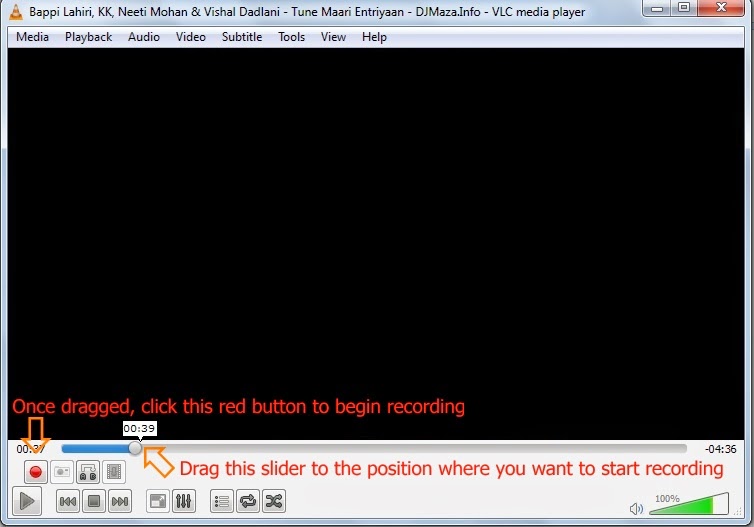 *. That's it! You have successfully cut the and saved mp3 song. Normally it automatically stored in C:\Users\your_username\Music (For ex. C:\Users\Dell\Music).
Note that it may be stored with .mp4 file format so don't worry just change the file format to .mp3.
It is very easiest way to cut any mp3 song without any third party software. So enjoy with the power of VLC and keep visiting for more interesting post.
Mostly everyone use PDF format documents to share their files. Because of their portability they are most popular and you can also use them on your smartphones so that they becomes even more portable. For some secure data you may apply password protection for the PDF file. But when forgotten password or you want password for any important PDF document, here are some tools that will help you in recovering password.
Aimersoft PDF Password Remover Online
This is a best tool for unblocking password of PDF files online and you don't need to install anything on you computer. With this tool you can unlock PDF files online. Just visit the link and click on upload and upload password protected PDF file. You can also unlock multiple files at simultaneously.
PDF unlock Tool by Estelar
This is very useful tool to unlock PDF files. After installing this software you need to provide password protected file to it and it creates another copy of the file by removing password protection from it.
PDF Mate Free PDF Merger
 PDF mate is a free PDF unlocking tool and comes with some useful features. Apart from unlocking PDF files, it also ha PDF decrypter, PDF merger, image to PDF converter, PDF splitter and much more. It also support editing, copy and printing of PDF files.
You can use these tools to unlock your PDF password protected files easily can avoid losing your important data.
 simple tricks can make your life easy. Keep following for further more
tricks.
